-
1. Untuk Bermula
-
2. Git Basics
- 2.1 Mendapatkan suatu Repositori Git
- 2.2 Merekodkan Perubahan bagi Repositori
- 2.3 Viewing the Commit History
- 2.4 Undoing Things
- 2.5 Working with Remotes
- 2.6 Tagging
- 2.7 Alias Git
- 2.8 Summary
-
3. Git Branching
- 3.1 Branches in a Nutshell
- 3.2 Basic Branching and Merging
- 3.3 Branch Management
- 3.4 Branching Workflows
- 3.5 Remote Branches
- 3.6 Rebasing
- 3.7 Summary
-
4. Git on the Server
- 4.1 The Protocols
- 4.2 Getting Git on a Server
- 4.3 Generating Your SSH Public Key
- 4.4 Setting Up the Server
- 4.5 Git Daemon
- 4.6 Smart HTTP
- 4.7 GitWeb
- 4.8 GitLab
- 4.9 Third Party Hosted Options
- 4.10 Summary
-
5. Distributed Git
- 5.1 Distributed Workflows
- 5.2 Contributing to a Project
- 5.3 Maintaining a Project
- 5.4 Summary
-
6. GitHub
-
7. Git Tools
- 7.1 Revision Selection
- 7.2 Interactive Staging
- 7.3 Stashing and Cleaning
- 7.4 Signing Your Work
- 7.5 Searching
- 7.6 Rewriting History
- 7.7 Reset Demystified
- 7.8 Advanced Merging
- 7.9 Rerere
- 7.10 Debugging with Git
- 7.11 Submodules
- 7.12 Bundling
- 7.13 Replace
- 7.14 Credential Storage
- 7.15 Summary
-
8. Customizing Git
- 8.1 Git Configuration
- 8.2 Git Attributes
- 8.3 Git Hooks
- 8.4 An Example Git-Enforced Policy
- 8.5 Summary
-
9. Git and Other Systems
- 9.1 Git as a Client
- 9.2 Migrating to Git
- 9.3 Summary
-
10. Git Internals
- 10.1 Plumbing and Porcelain
- 10.2 Git Objects
- 10.3 Git References
- 10.4 Packfiles
- 10.5 The Refspec
- 10.6 Transfer Protocols
- 10.7 Maintenance and Data Recovery
- 10.8 Environment Variables
- 10.9 Summary
-
A1. Appendix A: Git in Other Environments
- A1.1 Graphical Interfaces
- A1.2 Git in Visual Studio
- A1.3 Git in Eclipse
- A1.4 Git in Bash
- A1.5 Git in Zsh
- A1.6 Git in Powershell
- A1.7 Summary
-
A2. Appendix B: Embedding Git in your Applications
- A2.1 Command-line Git
- A2.2 Libgit2
- A2.3 JGit
-
A3. Appendix C: Git Commands
- A3.1 Setup and Config
- A3.2 Getting and Creating Projects
- A3.3 Basic Snapshotting
- A3.4 Branching and Merging
- A3.5 Sharing and Updating Projects
- A3.6 Inspection and Comparison
- A3.7 Debugging
- A3.8 Patching
- A3.9 Email
- A3.10 External Systems
- A3.11 Administration
- A3.12 Plumbing Commands
5.1 Distributed Git - Distributed Workflows
Now that you have a remote Git repository set up as a focal point for all the developers to share their code, and you’re familiar with basic Git commands in a local workflow, you’ll look at how to utilize some of the distributed workflows that Git affords you.
In this chapter, you’ll see how to work with Git in a distributed environment as a contributor and an integrator. That is, you’ll learn how to contribute code successfully to a project and make it as easy on you and the project maintainer as possible, and also how to maintain a project successfully with a number of developers contributing.
Distributed Workflows
Unlike Centralized Version Control Systems (CVCSs), the distributed nature of Git allows you to be far more flexible in how developers collaborate on projects. In centralized systems, every developer is a node working more or less equally on a central hub. In Git, however, every developer is potentially both a node and a hub — that is, every developer can both contribute code to other repositories and maintain a public repository on which others can base their work and which they can contribute to. This opens a vast range of workflow possibilities for your project and/or your team, so we’ll cover a few common paradigms that take advantage of this flexibility. We’ll go over the strengths and possible weaknesses of each design; you can choose a single one to use, or you can mix and match features from each.
Centralized Workflow
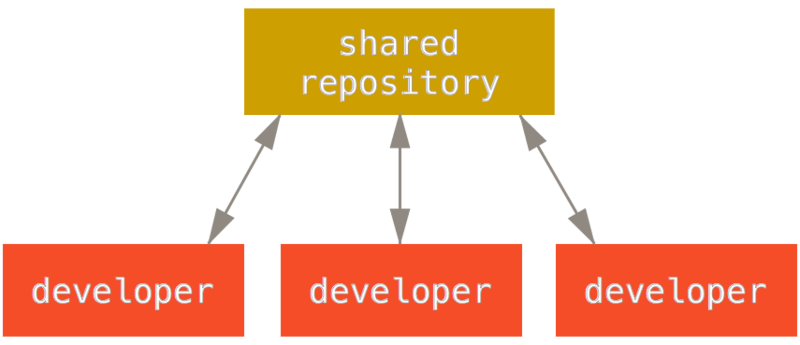
In centralized systems, there is generally a single collaboration model — the centralized workflow. One central hub, or repository, can accept code, and everyone synchronizes their work to it. A number of developers are nodes — consumers of that hub — and synchronize to that one place.

This means that if two developers clone from the hub and both make changes, the first developer to push their changes back up can do so with no problems. The second developer must merge in the first one’s work before pushing changes up, so as not to overwrite the first developer’s changes. This concept is as true in Git as it is in Subversion (or any CVCS), and this model works perfectly well in Git.
If you are already comfortable with a centralized workflow in your company or team, you can easily continue using that workflow with Git. Simply set up a single repository, and give everyone on your team push access; Git won’t let users overwrite each other. Say John and Jessica both start working at the same time. John finishes his change and pushes it to the server. Then Jessica tries to push her changes, but the server rejects them. She is told that she’s trying to push non-fast-forward changes and that she won’t be able to do so until she fetches and merges. This workflow is attractive to a lot of people because it’s a paradigm that many are familiar and comfortable with.
This is also not limited to small teams. With Git’s branching model, it’s possible for hundreds of developers to successfully work on a single project through dozens of branches simultaneously.
Integration-Manager Workflow
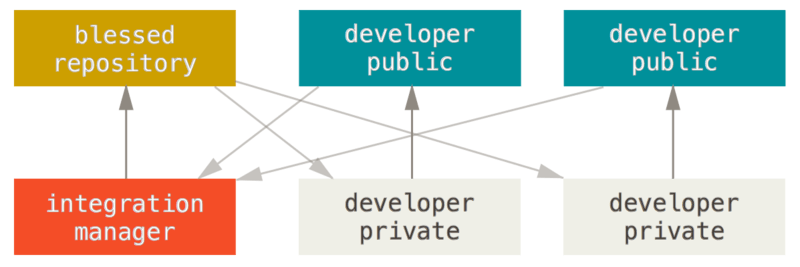
Because Git allows you to have multiple remote repositories, it’s possible to have a workflow where each developer has write access to their own public repository and read access to everyone else’s. This scenario often includes a canonical repository that represents the “official” project. To contribute to that project, you create your own public clone of the project and push your changes to it. Then, you can send a request to the maintainer of the main project to pull in your changes. The maintainer can then add your repository as a remote, test your changes locally, merge them into their branch, and push back to their repository. The process works as follows (see Integration-manager workflow.):
-
The project maintainer pushes to their public repository.
-
A contributor clones that repository and makes changes.
-
The contributor pushes to their own public copy.
-
The contributor sends the maintainer an email asking them to pull changes.
-
The maintainer adds the contributor’s repository as a remote and merges locally.
-
The maintainer pushes merged changes to the main repository.

This is a very common workflow with hub-based tools like GitHub or GitLab, where it’s easy to fork a project and push your changes into your fork for everyone to see. One of the main advantages of this approach is that you can continue to work, and the maintainer of the main repository can pull in your changes at any time. Contributors don’t have to wait for the project to incorporate their changes — each party can work at their own pace.
Dictator and Lieutenants Workflow
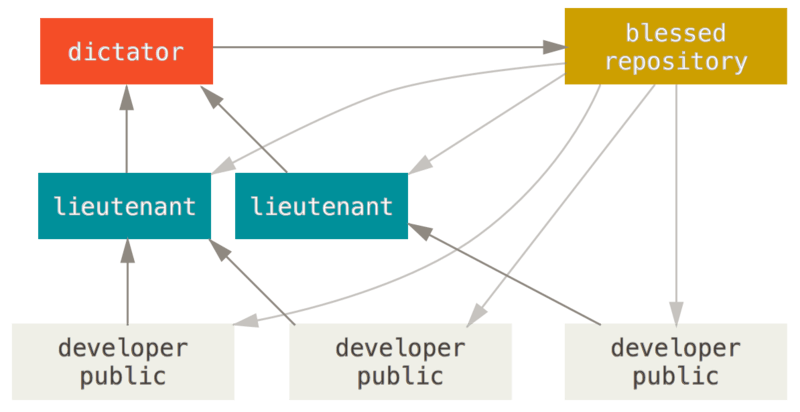
This is a variant of a multiple-repository workflow. It’s generally used by huge projects with hundreds of collaborators; one famous example is the Linux kernel. Various integration managers are in charge of certain parts of the repository; they’re called lieutenants. All the lieutenants have one integration manager known as the benevolent dictator. The benevolent dictator pushes from his directory to a reference repository from which all the collaborators need to pull. The process works like this (see Benevolent dictator workflow.):
-
Regular developers work on their topic branch and rebase their work on top of
master. Themasterbranch is that of the reference directory to which the dictator pushes. -
Lieutenants merge the developers' topic branches into their
masterbranch. -
The dictator merges the lieutenants'
masterbranches into the dictator’smasterbranch. -
Finally, the dictator pushes that
masterbranch to the reference repository so the other developers can rebase on it.

This kind of workflow isn’t common, but can be useful in very big projects, or in highly hierarchical environments. It allows the project leader (the dictator) to delegate much of the work and collect large subsets of code at multiple points before integrating them.
Workflows Summary
These are some commonly used workflows that are possible with a distributed system like Git, but you can see that many variations are possible to suit your particular real-world workflow. Now that you can (hopefully) determine which workflow combination may work for you, we’ll cover some more specific examples of how to accomplish the main roles that make up the different flows. In the next section, you’ll learn about a few common patterns for contributing to a project.