-
1. Começando
- 1.1 Sobre Controle de Versão
- 1.2 Uma Breve História do Git
- 1.3 O Básico do Git
- 1.4 A Linha de Comando
- 1.5 Instalando o Git
- 1.6 Configuração Inicial do Git
- 1.7 Pedindo Ajuda
- 1.8 Sumário
-
2. Fundamentos de Git
-
3. Branches no Git
-
4. Git on the Server
- 4.1 The Protocols
- 4.2 Getting Git on a Server
- 4.3 Generating Your SSH Public Key
- 4.4 Setting Up the Server
- 4.5 Git Daemon
- 4.6 Smart HTTP
- 4.7 GitWeb
- 4.8 GitLab
- 4.9 Third Party Hosted Options
- 4.10 Summary
-
5. Distributed Git
-
6. GitHub
- 6.1 Configurando uma conta
- 6.2 Contribuindo em um projeto
- 6.3 Maintaining a Project
- 6.4 Managing an organization
- 6.5 Scripting GitHub
- 6.6 Summary
-
7. Git Tools
- 7.1 Revision Selection
- 7.2 Interactive Staging
- 7.3 Stashing and Cleaning
- 7.4 Signing Your Work
- 7.5 Searching
- 7.6 Rewriting History
- 7.7 Reset Demystified
- 7.8 Advanced Merging
- 7.9 Rerere
- 7.10 Debugging with Git
- 7.11 Submodules
- 7.12 Bundling
- 7.13 Replace
- 7.14 Credential Storage
- 7.15 Summary
-
8. Customizing Git
- 8.1 Git Configuration
- 8.2 Git Attributes
- 8.3 Git Hooks
- 8.4 An Example Git-Enforced Policy
- 8.5 Summary
-
9. Git and Other Systems
- 9.1 Git as a Client
- 9.2 Migrating to Git
- 9.3 Summary
-
10. Funcionamento Interno do Git
- 10.1 Encanamento e Porcelana
- 10.2 Objetos do Git
- 10.3 Referências do Git
- 10.4 Packfiles
- 10.5 The Refspec
- 10.6 Transfer Protocols
- 10.7 Maintenance and Data Recovery
- 10.8 Variáveis de ambiente
- 10.9 Sumário
-
A1. Appendix A: Git em Outros Ambientes
- A1.1 Graphical Interfaces
- A1.2 Git in Visual Studio
- A1.3 Git in Eclipse
- A1.4 Git in Bash
- A1.5 Git in Zsh
- A1.6 Git in Powershell
- A1.7 Resumo
-
A2. Appendix B: Embedding Git in your Applications
- A2.1 Command-line Git
- A2.2 Libgit2
- A2.3 JGit
-
A3. Appendix C: Git Commands
- A3.1 Setup and Config
- A3.2 Getting and Creating Projects
- A3.3 Basic Snapshotting
- A3.4 Branching and Merging
- A3.5 Sharing and Updating Projects
- A3.6 Inspection and Comparison
- A3.7 Debugging
- A3.8 Patching
- A3.9 Email
- A3.10 External Systems
- A3.11 Administration
- A3.12 Plumbing Commands
7.9 Git Tools - Rerere
Rerere
The git rerere functionality is a bit of a hidden feature.
The name stands for “reuse recorded resolution” and as the name implies, it allows you to ask Git to remember how you’ve resolved a hunk conflict so that the next time it sees the same conflict, Git can automatically resolve it for you.
There are a number of scenarios in which this functionality might be really handy.
One of the examples that is mentioned in the documentation is if you want to make sure a long lived topic branch will merge cleanly but don’t want to have a bunch of intermediate merge commits.
With rerere turned on you can merge occasionally, resolve the conflicts, then back out the merge.
If you do this continuously, then the final merge should be easy because rerere can just do everything for you automatically.
This same tactic can be used if you want to keep a branch rebased so you don’t have to deal with the same rebasing conflicts each time you do it. Or if you want to take a branch that you merged and fixed a bunch of conflicts and then decide to rebase it instead - you likely won’t have to do all the same conflicts again.
Another situation is where you merge a bunch of evolving topic branches together into a testable head occasionally, as the Git project itself often does. If the tests fail, you can rewind the merges and re-do them without the topic branch that made the tests fail without having to re-resolve the conflicts again.
To enable the rerere functionality, you simply have to run this config setting:
$ git config --global rerere.enabled trueYou can also turn it on by creating the .git/rr-cache directory in a specific repository, but the config setting is clearer and it can be done globally.
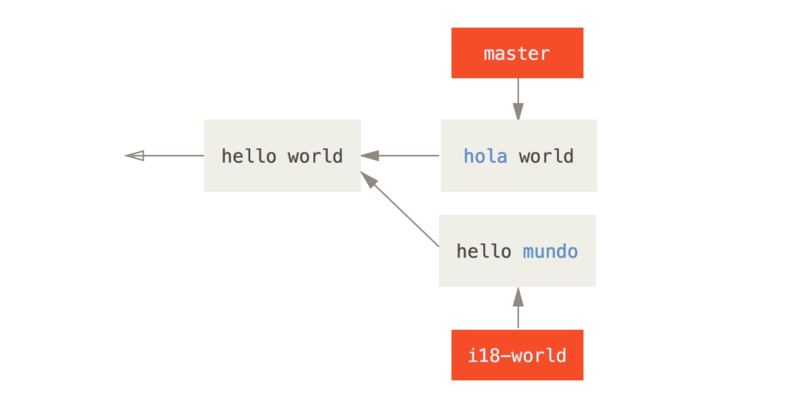
Now let’s see a simple example, similar to our previous one.
Let’s say we have a file named hello.rb that looks like this:
#! /usr/bin/env ruby

def hello
  puts 'hello world'
end
In one branch we change the word “hello” to “hola”, then in another branch we change the “world” to “mundo”, just like before.

When we merge the two branches together, we’ll get a merge conflict:
$ git merge i18n-world
Auto-merging hello.rb
CONFLICT (content): Merge conflict in hello.rb
Recorded preimage for 'hello.rb'
Automatic merge failed; fix conflicts and then commit the result.
You should notice the new line Recorded preimage for FILE in there.
Otherwise it should look exactly like a normal merge conflict.
At this point, rerere can tell us a few things.
Normally, you might run git status at this point to see what all conflicted:
$ git status
# On branch master
# Unmerged paths:
#   (use "git reset HEAD <file>..." to unstage)
#   (use "git add <file>..." to mark resolution)
#
#	both modified:      hello.rb
#
However, git rerere will also tell you what it has recorded the pre-merge state for with git rerere status:
$ git rerere status
hello.rb
And git rerere diff will show the current state of the resolution - what you started with to resolve and what you’ve resolved it to.
$ git rerere diff
--- a/hello.rb
+++ b/hello.rb
@@ -1,11 +1,11 @@
 #! /usr/bin/env ruby

 def hello
-<<<<<<<
-  puts 'hello mundo'
-=======
+<<<<<<< HEAD
   puts 'hola world'
->>>>>>>
+=======
+  puts 'hello mundo'
+>>>>>>> i18n-world
 end
Also (and this isn’t really related to rerere), you can use ls-files -u to see the conflicted files and the before, left and right versions:
$ git ls-files -u
100644 39804c942a9c1f2c03dc7c5ebcd7f3e3a6b97519 1	hello.rb
100644 a440db6e8d1fd76ad438a49025a9ad9ce746f581 2	hello.rb
100644 54336ba847c3758ab604876419607e9443848474 3	hello.rb
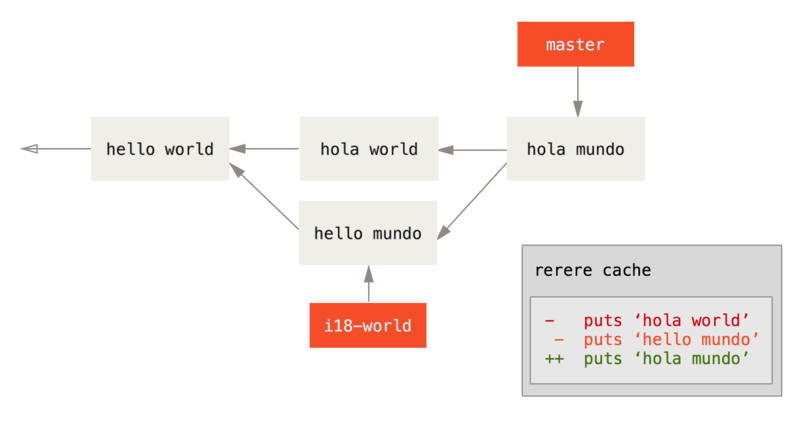
Now you can resolve it to just be puts 'hola mundo' and you can run the rerere diff command again to see what rerere will remember:
$ git rerere diff
--- a/hello.rb
+++ b/hello.rb
@@ -1,11 +1,7 @@
 #! /usr/bin/env ruby

 def hello
-<<<<<<<
-  puts 'hello mundo'
-=======
-  puts 'hola world'
->>>>>>>
+  puts 'hola mundo'
 end
So that basically says, when Git sees a hunk conflict in a hello.rb file that has “hello mundo” on one side and “hola world” on the other, it will resolve it to “hola mundo”.
Now we can mark it as resolved and commit it:
$ git add hello.rb
$ git commit
Recorded resolution for 'hello.rb'.
[master 68e16e5] Merge branch 'i18n'
You can see that it "Recorded resolution for FILE".

Now, let’s undo that merge and then rebase it on top of our master branch instead.
We can move our branch back by using reset as we saw in Reset Demystified.
$ git reset --hard HEAD^
HEAD is now at ad63f15 i18n the hello
Our merge is undone. Now let’s rebase the topic branch.
$ git checkout i18n-world
Switched to branch 'i18n-world'

$ git rebase master
First, rewinding head to replay your work on top of it...
Applying: i18n one word
Using index info to reconstruct a base tree...
Falling back to patching base and 3-way merge...
Auto-merging hello.rb
CONFLICT (content): Merge conflict in hello.rb
Resolved 'hello.rb' using previous resolution.
Failed to merge in the changes.
Patch failed at 0001 i18n one word
Now, we got the same merge conflict like we expected, but take a look at the Resolved FILE using previous resolution line.
If we look at the file, we’ll see that it’s already been resolved, there are no merge conflict markers in it.
#! /usr/bin/env ruby

def hello
  puts 'hola mundo'
end
Also, git diff will show you how it was automatically re-resolved:
$ git diff
diff --cc hello.rb
index a440db6,54336ba..0000000
--- a/hello.rb
+++ b/hello.rb
@@@ -1,7 -1,7 +1,7 @@@
  #! /usr/bin/env ruby

  def hello
-   puts 'hola world'
 -  puts 'hello mundo'
++  puts 'hola mundo'
  end
You can also recreate the conflicted file state with the checkout command:
$ git checkout --conflict=merge hello.rb
$ cat hello.rb
#! /usr/bin/env ruby

def hello
<<<<<<< ours
  puts 'hola world'
=======
  puts 'hello mundo'
>>>>>>> theirs
end
We saw an example of this in Advanced Merging.
For now though, let’s re-resolve it by just running rerere again:
$ git rerere
Resolved 'hello.rb' using previous resolution.
$ cat hello.rb
#! /usr/bin/env ruby

def hello
  puts 'hola mundo'
end
We have re-resolved the file automatically using the rerere cached resolution.
You can now add and continue the rebase to complete it.
$ git add hello.rb
$ git rebase --continue
Applying: i18n one word
So, if you do a lot of re-merges, or want to keep a topic branch up to date with your master branch without a ton of merges, or you rebase often, you can turn on rerere to help your life out a bit.